In today’s digital world, creating backups, flashing operating systems, and transferring data to portable devices has become more important than ever. Whether you are a tech enthusiast working with Raspberry Pi, an IT professional, or simply someone who wants to safeguard data, you’ve probably come across the term Win32 Disk Imager (often written as win32diskimager).
This lightweight but powerful open-source tool has been trusted by millions of users worldwide for creating and writing raw disk image files to USB drives, SD cards, and other removable storage devices. In this blog, we’ll explore everything you need to know about Win32 Disk Imager—from what it is, how it works, its features, benefits, installation, and alternatives. By the end, you’ll understand why it continues to be one of the most popular tools for disk imaging tasks.
Win32 Disk Imager is a free and open-source utility designed for Windows operating systems. Its main purpose is to write raw image files (like .img or .iso) to USB flash drives, SD cards, and other removable storage devices. It can also create backups by reading a device and saving it as an image file on your computer.
This makes it particularly useful for:
Burning operating system images (e.g., Linux distributions, Raspberry Pi OS) onto SD cards.
Creating bootable USB drives.
Backing up USB drives or SD cards for recovery later.
Cloning data from one portable device to another.
In short, Win32 Disk Imager acts as a bridge between disk image files and your physical storage device.
Here are the standout features that make win32diskimager a go-to tool for many users:
.img, .iso, and other raw disk image formats.Ease of Use
With just a few clicks, you can write or read disk images. There’s no steep learning curve.
Reliability
It is known for creating reliable bootable media that works without errors.
Perfect for Raspberry Pi Users
Raspberry Pi projects often require OS images to be flashed onto SD cards. Win32 Disk Imager makes this process seamless.
Data Backup and Recovery
You can back up your SD cards or USB drives and restore them later in case of corruption or accidental deletion.
Free Forever
Unlike some paid disk imaging tools, this one is open source and completely free.
Light on System Resources
Even older PCs can run it without performance issues.
Here’s a step-by-step guide to help you get started:
Download the Software
Visit the official SourceForge page or other trusted repositories.
Search for win32diskimager download.
Always ensure you are downloading from a safe source to avoid malware.
Install the Application
Run the installer and follow the on-screen instructions.
Select your preferred installation location.
The process usually takes less than a minute.
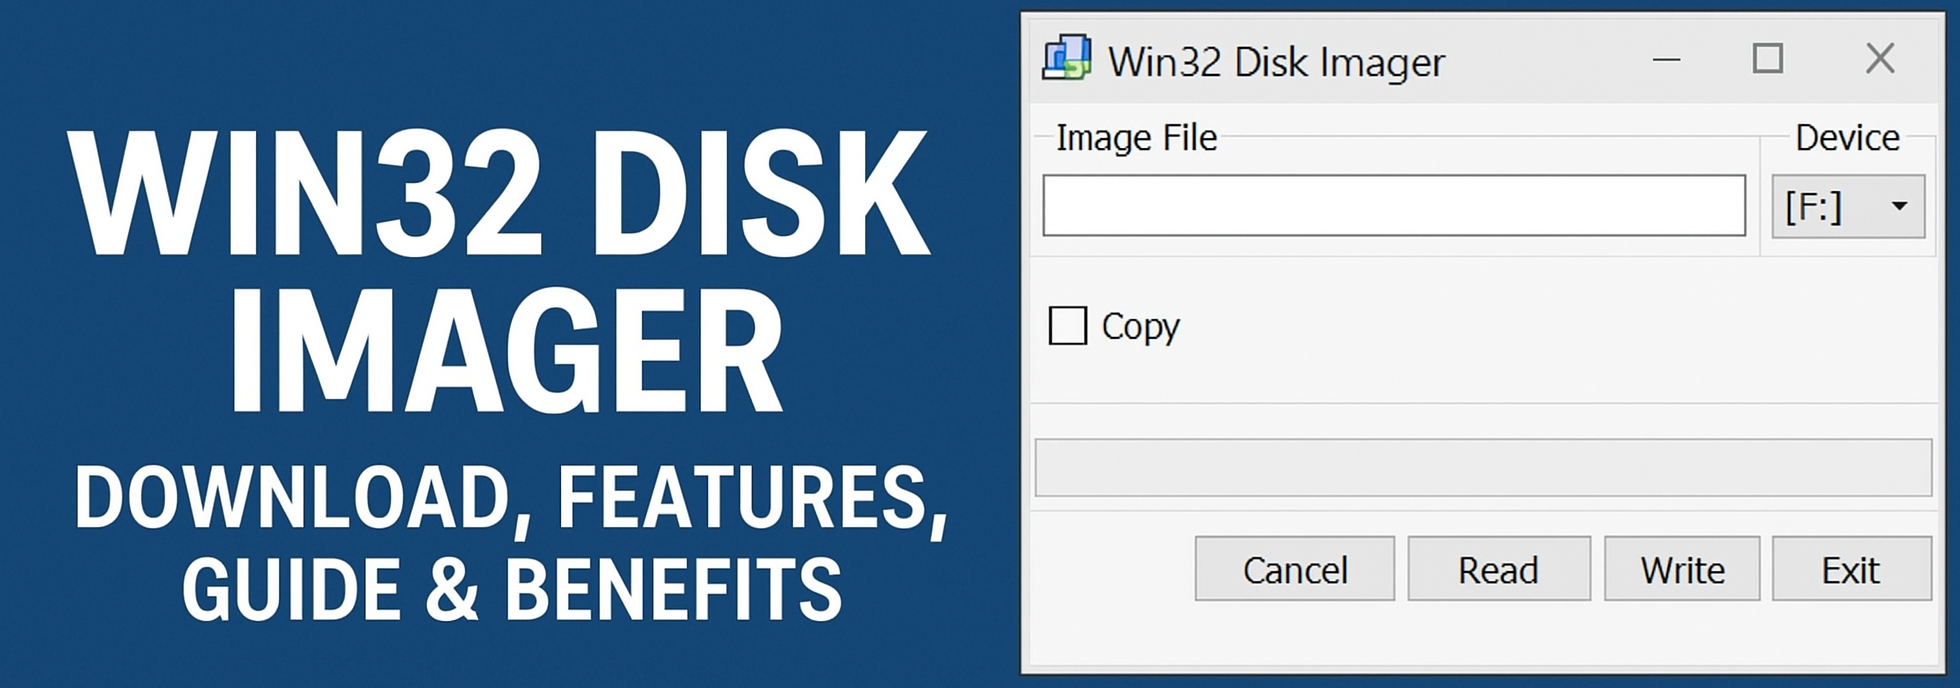
Launch the Program
Once installed, open Win32 Disk Imager from your Start menu or desktop shortcut.
Insert your USB drive or SD card into your computer.
Launch Win32 Disk Imager.
Browse and select the image file you want to write (e.g., raspbian.img).
Choose the correct device drive letter.
Click Write.
Wait for the process to complete, then safely eject your device.
Insert the device you want to back up.
Open the software.
Select the destination folder and file name for the backup.
Choose your device letter.
Click Read.
The program will create an image file of your device.
Device Not Detected
Check if your USB/SD card is properly inserted.
Try a different port.
Write Error
Ensure the device has enough storage space.
Format the drive before writing.
Corrupted Image File
Redownload the .img file from a reliable source.
Slow Speed
This can depend on the quality of the SD card or USB drive. Use high-quality, fast drives for best results.
While win32diskimager is highly effective, you might also want to consider alternatives depending on your needs:
Rufus – Best for creating bootable USB drives for Windows and Linux.
Balena Etcher – Very beginner-friendly and works across Windows, macOS, and Linux.
UNetbootin – Ideal for installing Linux distributions.
dd Command (Linux/Unix) – A powerful built-in tool for advanced users.
However, many users stick to Win32 Disk Imager because of its simplicity and reliability.
Always double-check the drive letter before writing to avoid overwriting the wrong disk.
Keep backups of important data, as the process will erase existing files on the target device.
Download the tool only from official or trusted sources.
If you’re looking for a lightweight, free, and straightforward tool, Win32 Disk Imager ticks all the boxes. It’s trusted by Raspberry Pi users, IT professionals, students, and hobbyists worldwide. Its ability to both write and read disk images makes it versatile for different scenarios. Unlike bulky commercial software, it focuses on doing one job well—writing and backing up disk images.
Q1: Is Win32 Disk Imager free to use?
Yes, it’s completely free and open source.
Q2: Can I use it on macOS or Linux?
No, it’s designed for Windows. For macOS/Linux, you can try Balena Etcher or dd command.
Q3: Does it support ISO files?
Yes, it can write .iso files as well as .img files.
Q4: Can I use it to back up my SD card?
Absolutely! Just use the Read function to create a backup image.
Q5: Is it safe to use?
Yes, as long as you download it from a trusted source like SourceForge.
Q6: What’s the difference between Win32 Disk Imager and Rufus?
Win32 Disk Imager is better for Raspberry Pi and SD card backups, while Rufus is focused on creating bootable USB drives for operating systems.
Win32 Disk Imager (or win32diskimager) is one of those rare tools that combine simplicity with powerful functionality. It’s free, lightweight, reliable, and perfect for anyone who needs to create bootable media or back up removable devices.
If you’re a Raspberry Pi enthusiast, student, or IT professional, this tool is a must-have in your software toolkit. While alternatives like Rufus and Balena Etcher are also great, Win32 Disk Imager stands out for its ease of use and straightforward approach.
So, the next time you want to flash an operating system onto an SD card, or back up your USB drive, remember that Win32 Disk Imager is just a click away.